".extra-menu { background-color: #f3f3f3; padding: 20px; } .extra-menu .extra-menu-h { height: 36px; } .extra-menu .extra-menu-h h3 { display:inline-block; } .extra-menu ul a{ text-decoration: none; } .extra-menu .menu-child { text-indent: 4em; } .extra-menu .menu-child:before { left: 4em; } .extra-menu .extra-menu-h h3 { line-height: 36px; } .collapse-toggle { float: right; cursor: pointer; user-select: none; display: inline-flex; align-items: center; font-size: 14px; } .collapse-toggle img { width: 30%; transform: rotate(180deg); } .collapse-content { margin-bottom: 0px !important; margin-top: 20px !important; overflow: hidden; max-height: 0; transition: max-height 0.3s ease-out; } .collapse-content.expanded { max-height: 1000px; /\* 设置一个足够大的值,确保内容可以完全展开 \*/ } .ph-id { position: relative; top: -90px; } jQuery(document).ready(function( $ ) { $('.collapse-toggle').on('click',function(){ var content = document.querySelector('.collapse-content'); content.classList.toggle('expanded'); if (content.classList.contains('expanded')) { $(this).find('div').text('收起'); $(this).find('img').css('transform','rotate(180deg)'); } else { $(this).find('div').text('展开'); $(this).find('img').css('transform','rotate(0deg)'); } }) })
之前用WordPress做了一个博客网站,为了保障网络安全链接想安装一个SSL证书,刚好买[Namecheap](/#)域名的时候送了一个免费的SSL证书,下面就教大家把免费的SSL证书配置到服务器上的方法,需要的小伙伴可以了解一下。
一、申请证书(将xiaohost换成自己的域名)
1、登录服务器
2、输入下面的命令
cd /usr/local/nginx/conf/
3、接着输入下面命令
openssl genrsa -out xiaohost.pem 2048
显示以下内容:
Generating RSA private key, 2048 bit long modulus
…..+++
.+++
e is 65537 (0x10001)
4、然后输入下面命令
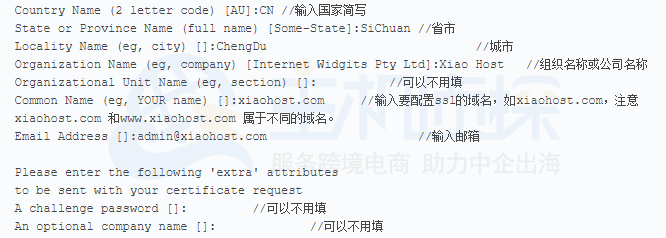
openssl req -new -key xiaohost.pem -out xiaohost.csr
根据下面提示填写相关内容

5、输入下方命令
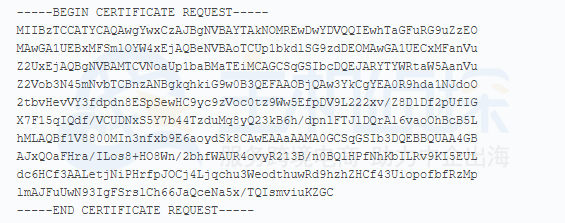
cat xiaohost.csr
显示以下类似的信息

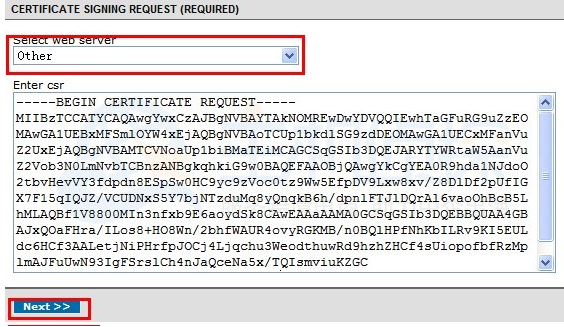
然后将上面内容全部复制下来到[Namecheap官网](https://go.idcspy.com/namecheap.com)登录账号激活你的SSL证书。

将csr内容粘贴进csr区域(由于没有Nginx服务器选项,下拉框选择Other)

选择验证邮箱(你收的到邮件的邮箱,建议选择右边你域名whois信息的邮箱)然后跟着流程走,
然后你邮箱会收到验证信息

点开验证链接,然后输入上面的优惠码,完成后十分钟就会受到Comodo寄来的数字证书。
二、配置证书
1、下载邮件附件里的xiaohost\_com.zip,上传到/usr/local/nginx/conf 下面。
2、输入命令
cat xiaohost\_com.crt >> PositiveSSLCA.crt
mv PositiveSSLCA.crt xiaohost\_com.crt
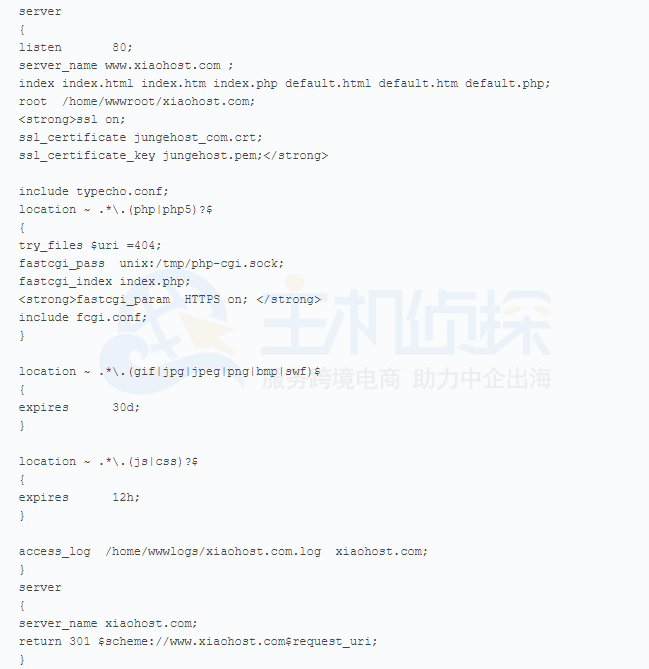
3、Nginx虚拟主机添加SSL

将以上内容按照自己的配置修改,添加加粗内容到在nginx.conf 里任意一个server {}的后面即可。
然后执行
/usr/local/nginx/sbin/nginx -t
检查配置是否有错误,执行
kill -HUP \`cat /usr/local/nginx/logs/nginx.pid
最后点击重启就可以了。
相关推荐:
《[Namecheap优惠码整理](/#)》
《[Namecheap免费DNS服务设置](/#)》"
松果号 作者:松果号原创文章,如若转载,请注明出处:https://www.6480i.com/archives/107440.html
