".extra-menu { background-color: #f3f3f3; padding: 20px; } .extra-menu .extra-menu-h { height: 36px; } .extra-menu .extra-menu-h h3 { display:inline-block; } .extra-menu ul a{ text-decoration: none; } .extra-menu .menu-child { text-indent: 4em; } .extra-menu .menu-child:before { left: 4em; } .extra-menu .extra-menu-h h3 { line-height: 36px; } .collapse-toggle { float: right; cursor: pointer; user-select: none; display: inline-flex; align-items: center; font-size: 14px; } .collapse-toggle img { width: 30%; transform: rotate(180deg); } .collapse-content { margin-bottom: 0px !important; margin-top: 20px !important; overflow: hidden; max-height: 0; transition: max-height 0.3s ease-out; } .collapse-content.expanded { max-height: 1000px; /\* 设置一个足够大的值,确保内容可以完全展开 \*/ } .ph-id { position: relative; top: -90px; } jQuery(document).ready(function( $ ) { $('.collapse-toggle').on('click',function(){ var content = document.querySelector('.collapse-content'); content.classList.toggle('expanded'); if (content.classList.contains('expanded')) { $(this).find('div').text('收起'); $(this).find('img').css('transform','rotate(180deg)'); } else { $(this).find('div').text('展开'); $(this).find('img').css('transform','rotate(0deg)'); } }) })
我们都知道购买[Namecheap](/#)域名都是会赠送免费whois保护,也就是域名隐私保护。很多站长不知道什么是域名隐私保护,也不知道该如何操作,下面小编就和大家说说Namecheap开启免费whois保护的方法。
**一、什么是whois保护**
whois保护即域名隐私保护,注册域名时,我们的个人详细信息将保存在名为whois的公共数据库中。域隐私保护基本上是自己购买的“附加”服务,用于保护您的个人数据并使其隐藏在世界其它地方。
**二、Namecheap开启免费whois保护**
1、首先我们需要注册Namecheap域名,然后前往后台域名列表。
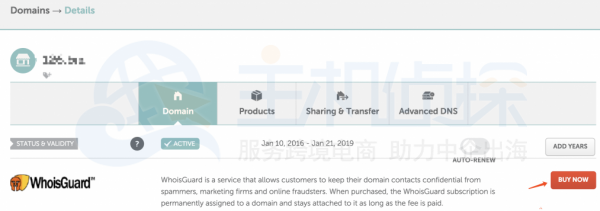
2、选择需要开启隐私保护的域名,点击“MANAGE”。

3、点击页面中 WhoisGuard 后面的 “BUY NOW”,进行购买。(虽然是免费的,但是还是需要购买流程)

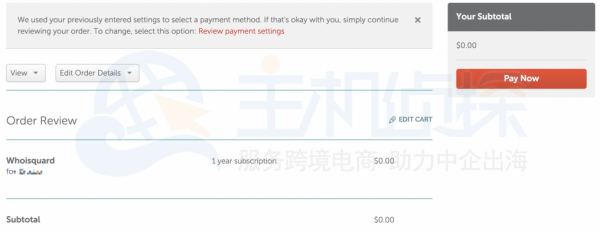
4、购买之后,我们可以看到价格是0元,“FREE FOREVER”也就是永久免费的意思。然后我们点击“Confirm Order ”进入下一步。

5、点击“Pay Now”,进行象征性的付款,其实不会扣钱,甚至不会让你选择付款方式。然后等待订单自动完成,稍后再去查看我们的域名的 whois 信息,就会发现已经开启了隐私保护了。

以上就是Namecheap开启免费whois保护的方法,感兴趣的站长朋友可以了解一下。
阅读推荐:
《[Namecheap优惠码整理汇总](/#)》
《[Namecheap购买域名图文教程](/#)》"
松果号 作者:松果号原创文章,如若转载,请注明出处:https://www.6480i.com/archives/107306.html
