".extra-menu { background-color: #f3f3f3; padding: 20px; } .extra-menu .extra-menu-h { height: 36px; } .extra-menu .extra-menu-h h3 { display:inline-block; } .extra-menu ul a{ text-decoration: none; } .extra-menu .menu-child { text-indent: 4em; } .extra-menu .menu-child:before { left: 4em; } .extra-menu .extra-menu-h h3 { line-height: 36px; } .collapse-toggle { float: right; cursor: pointer; user-select: none; display: inline-flex; align-items: center; font-size: 14px; } .collapse-toggle img { width: 30%; transform: rotate(180deg); } .collapse-content { margin-bottom: 0px !important; margin-top: 20px !important; overflow: hidden; max-height: 0; transition: max-height 0.3s ease-out; } .collapse-content.expanded { max-height: 1000px; /\* 设置一个足够大的值,确保内容可以完全展开 \*/ } .ph-id { position: relative; top: -90px; } jQuery(document).ready(function( $ ) { $('.collapse-toggle').on('click',function(){ var content = document.querySelector('.collapse-content'); content.classList.toggle('expanded'); if (content.classList.contains('expanded')) { $(this).find('div').text('收起'); $(this).find('img').css('transform','rotate(180deg)'); } else { $(this).find('div').text('展开'); $(this).find('img').css('transform','rotate(0deg)'); } }) })
[DigitalOcean](https://www.idcspy.com/digitalocean.html "DigitalOcean")是一家成立于2012年的美国主机提供商,这几年因采用SSD固态硬盘和支持按小时付费等多种优势成为企业和站长建站的第一选择。目前DigitalOcean在旧金山、纽约和新加坡等全球13个地方都设有数据中心,机房可选择性非常灵活。
我们都知道DigitalOcean Droplet是基于Linux的虚拟机,创建的每个Droplet都是可以使用的新服务器,可以独立使用,也可以作为较大的基于云的基础结构的一部分使用。我们可以使用各种不同的协议和文件传输客户端将文件从本地计算机传输到Droplet。今天将为大家介绍下DigitalOcean如何使用FileZilla传输文件,仅供大家参考。
**一、安装FileZilla**
在基于Debian的Linux发行版(如Ubuntu)上,您也可以使用APT软件包管理器安装FileZilla。
sudo apt-get update
sudo apt-get install filezilla
**二、配置FileZilla**
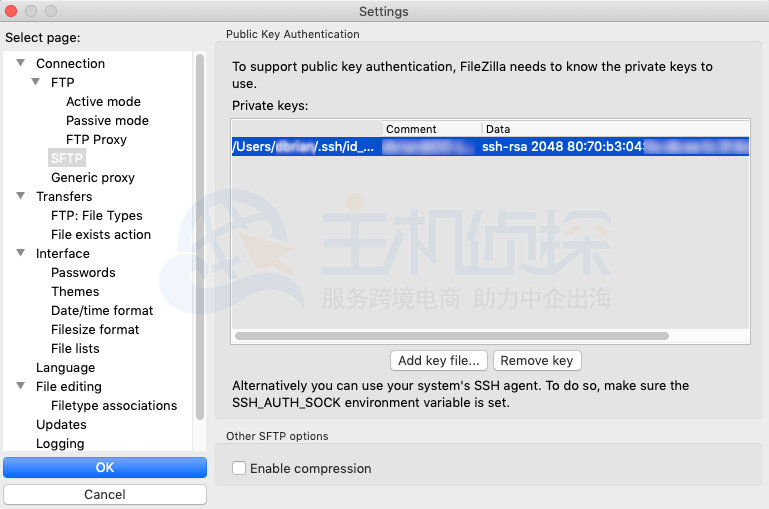
1、打开[FileZilla](/#),然后在“ 编辑”下拉菜单中单击“设置”;在“ 连接”部分中,单击SFTP,在此处添加Droplet的专用SSH密钥;单击添加密钥文件…,然后在本地计算机上找到Droplet的专用SSH密钥。

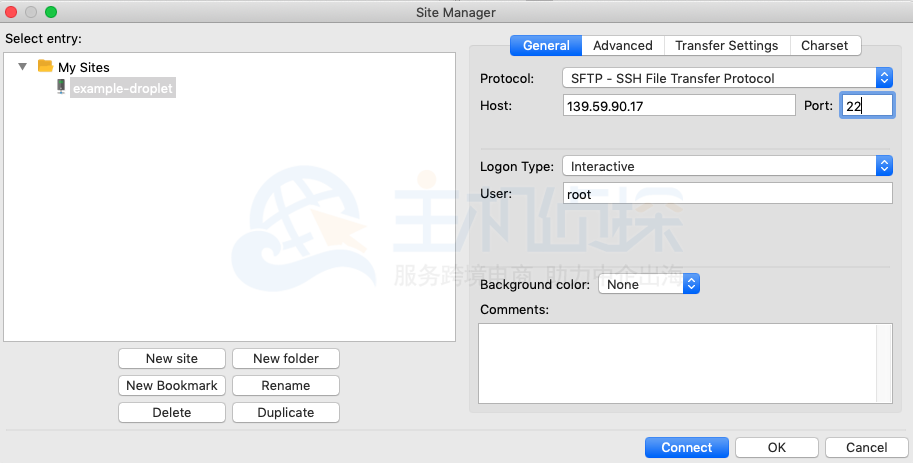
2、添加SSH密钥后,打开“ 文件”下拉菜单,然后单击“ 站点管理器”。站点管理器使您可以添加,删除和管理要使用FileZilla连接的服务器和设备。
3、单击新站点,然后输入Droplet的名称;在协议字段中,从下拉菜单中选择SFTP;在端口字段中,输入用于连接到Droplet的端口(默认为端口22);最后,在“ 登录类型”字段中,选择“ 交互式”。

4、输入设置后,点击连接。
**三、使用FileZilla传输文件**
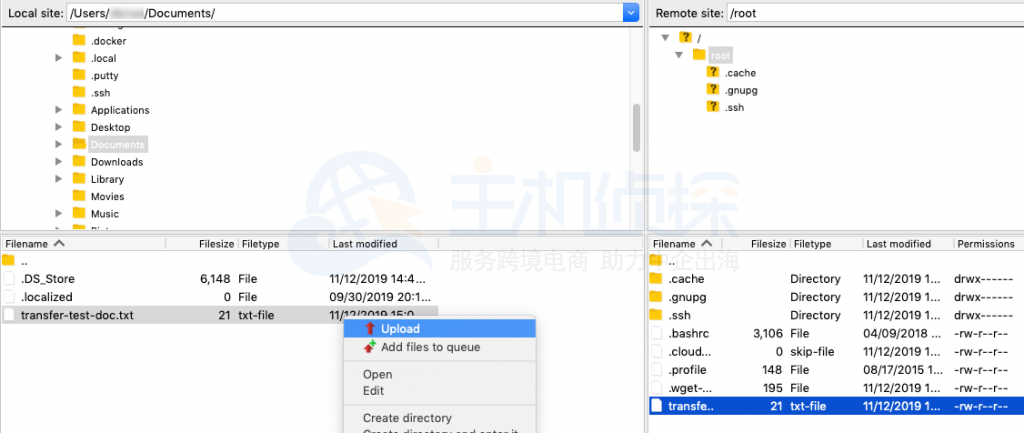
1、连接到Droplet后,请使用“ 本地站点”窗口导航到本地计算机的目录并找到要上传的文件。右键单击要传输到Droplet的文件,然后单击上载。

2、要将文件从Droplet传输到本地计算机,请使用远程站点窗口导航Droplet的目录,并找到要下载到本地计算机的文件。右键单击要从Droplet传输的文件,然后单击下载。
**更多教程:**[DigitalOcean教程](/#)"
松果号 作者:松果号原创文章,如若转载,请注明出处:https://www.6480i.com/archives/106941.html
