
".extra-menu { background-color: #f3f3f3; padding: 20px; } .extra-menu .extra-menu-h { height: 36px; } .extra-menu .extra-menu-h h3 { display:inline-block; } .extra-menu ul a{ text-decoration: none; } .extra-menu .menu-child { text-indent: 4em; } .extra-menu .menu-child:before { left: 4em; } .extra-menu .extra-menu-h h3 { line-height: 36px; } .collapse-toggle { float: right; cursor: pointer; user-select: none; display: inline-flex; align-items: center; font-size: 14px; } .collapse-toggle img { width: 30%; transform: rotate(180deg); } .collapse-content { margin-bottom: 0px !important; margin-top: 20px !important; overflow: hidden; max-height: 0; transition: max-height 0.3s ease-out; } .collapse-content.expanded { max-height: 1000px; /\* 设置一个足够大的值,确保内容可以完全展开 \*/ } .ph-id { position: relative; top: -90px; } jQuery(document).ready(function( $ ) { $('.collapse-toggle').on('click',function(){ var content = document.querySelector('.collapse-content'); content.classList.toggle('expanded'); if (content.classList.contains('expanded')) { $(this).find('div').text('收起'); $(this).find('img').css('transform','rotate(180deg)'); } else { $(this).find('div').text('展开'); $(this).find('img').css('transform','rotate(0deg)'); } }) })
有不少用户都知道,很多网站在建站之前都需要创建数据库,[HostGator](/#)虚拟主机支持MySQL、MSSQL等数据库,要怎么创建呢,接下来就来分享一下HostGator虚拟主机具体创建数据库方式。
一、Linux虚拟主机
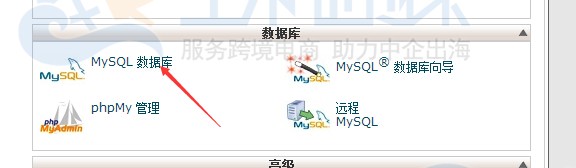
1.首先我们要登录到HostGator主机的控制面板,在“数据库”栏目中找到“MySQL数据库”,点击进入。
2.先创建数据库,在“生成数据库”部分创建一个数据库名,然后点击“生成数据库”创建。

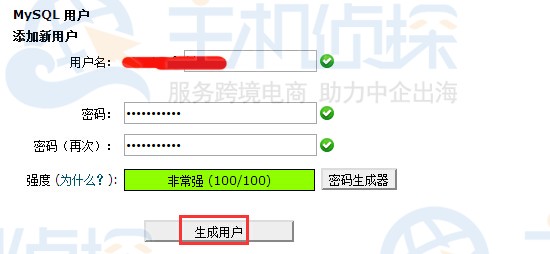
3.数据库创建后,还要创建数据库用户名。在“MySQL用户名”部分创建用户名和设置密码,点击“生成用户”。
4.数据库和用户名创建成功后,需要将用户名添加到数据库中,选择对应的用户名和数据库,然后点击“添加”。

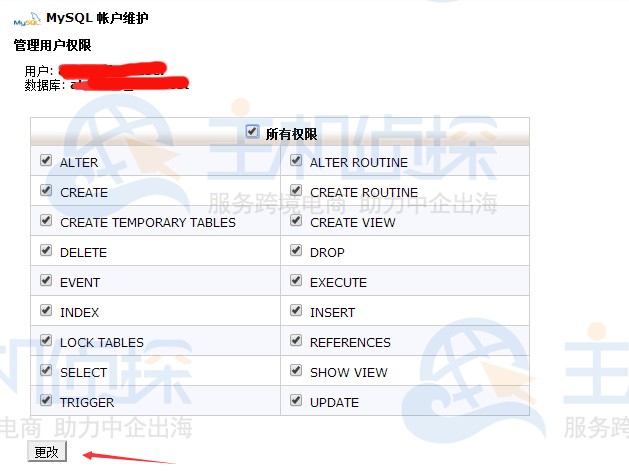
5.提示权限设置,我们根据自己的需求来给予全部权限。然后点“更改”保存。
二、Windows虚拟主机
1.登录到控制面板,在首页管理界面点击“添加新的数据库”。

2.创建数据库名称,选择数据库类型,然后创建用户名和密码,确认无误后点击“确认”创建成功。
3.返回到数据库管理页面会看到创建的数据库以及数据库服务器地址等信息。
以上就是HostGator虚拟主机创建数据库方式介绍,有需要的朋友可以关注一下本站,了解更多HostGator相关教程。
推荐:《[HostGator美国主机账户重置密码教程](/#)》"
松果号 作者:松果号原创文章,如若转载,请注明出处:https://www.6480i.com/archives/106450.html