".extra-menu { background-color: #f3f3f3; padding: 20px; } .extra-menu .extra-menu-h { height: 36px; } .extra-menu .extra-menu-h h3 { display:inline-block; } .extra-menu ul a{ text-decoration: none; } .extra-menu .menu-child { text-indent: 4em; } .extra-menu .menu-child:before { left: 4em; } .extra-menu .extra-menu-h h3 { line-height: 36px; } .collapse-toggle { float: right; cursor: pointer; user-select: none; display: inline-flex; align-items: center; font-size: 14px; } .collapse-toggle img { width: 30%; transform: rotate(180deg); } .collapse-content { margin-bottom: 0px !important; margin-top: 20px !important; overflow: hidden; max-height: 0; transition: max-height 0.3s ease-out; } .collapse-content.expanded { max-height: 1000px; /\* 设置一个足够大的值,确保内容可以完全展开 \*/ } .ph-id { position: relative; top: -90px; } jQuery(document).ready(function( $ ) { $('.collapse-toggle').on('click',function(){ var content = document.querySelector('.collapse-content'); content.classList.toggle('expanded'); if (content.classList.contains('expanded')) { $(this).find('div').text('收起'); $(this).find('img').css('transform','rotate(180deg)'); } else { $(this).find('div').text('展开'); $(this).find('img').css('transform','rotate(0deg)'); } }) })
[WordPress](/#) 是一款使用 PHP 语言开发的博客平台,大家可以通过 WordPress 搭建属于个人的博客平台。本文以 CentOS 7.6 操作系统的腾讯云云服务器为例,手动搭建 WordPress 个人站点。
进行搭建 WordPress 个人博客,需要熟悉 Linux 命令,例如 CentOS 环境下通过 YUM 安装软件 等常用命令,并对所安装软件的使用及版本兼容性比较了解。
**一、登录云服务器**
使用Putty等远程登录软件登录[腾讯云](/#)云服务器实例;
**二、手动搭建 LNMP 环境**
LNMP 是 Linux、Nginx、MariaDB 和 PHP 的缩写,这个组合是最常见的 Web 服务器的运行环境之一。在创建并登录云服务器实例之后,手动搭建 LNMP 环境完成基本环境搭建。
**三、配置数据库**
1、执行以下命令,进入 MariaDB。
mysql
2、执行以下命令,创建 MariaDB 数据库。例如 “wordpress”。
CREATE DATABASE wordpress;
3、执行以下命令,创建一个新用户。例如 “user”,登录密码为 `123456`。
CREATE USER 'user'@'localhost' IDENTIFIED BY '123456';
4、执行以下命令,赋予用户对 “wordpress” 数据库的全部权限。
GRANT ALL PRIVILEGES ON wordpress.* TO 'user'@'localhost' IDENTIFIED BY '123456';
5、执行以下命令,设置 root 帐户密码。
提醒:MariaDB 10.4 在 [CentOS](/#) 系统上已增加了 root 帐户免密登录功能,请执行以下步骤设置您的 root 帐户密码并牢记。
ALTER USER root@localhost IDENTIFIED VIA mysql_native_password USING PASSWORD('输入您的密码');
6、执行以下命令,使所有配置生效。
FLUSH PRIVILEGES;
7、执行以下命令,退出 MariaDB。
\q
**四、安装和配置 WordPress**
1、执行以下命令,删除网站根目录下用于测试 PHP-Nginx 配置的`index.php`文件。
rm -rf /usr/share/nginx/html/index.php
2、依次执行以下命令,进入`/usr/share/nginx/html/`目录,并下载与解压 WordPress。
cd /usr/share/nginx/html
wget https://cn.wordpress.org/wordpress-5.0.4-zh_CN.tar.gz
tar zxvf wordpress-5.0.4-zh_CN.tar.gz
**修改 WordPress 配置文件**
1、依次执行以下命令,进入 WordPress 安装目录,将`wp-config-sample.php`文件复制到`wp-config.php`文件中,并将原先的示例配置文件保留作为备份。
cd /usr/share/nginx/html/wordpress
cp wp-config-sample.php wp-config.php
2、执行以下命令,打开并编辑新创建的配置文件。
vim wp-config.php
3、按 **i** 切换至编辑模式,找到文件中 MySQL 的部分,并将相关配置信息修改为 配置 WordPress 数据库 中的内容。
// ** MySQL settings - You can get this info from your web host ** //
/** The name of the database for WordPress */
define('DB_NAME', 'wordpress');
/** MySQL database username */
define('DB_USER', 'user');
/** MySQL database password */
define('DB_PASSWORD', '123456');
/** MySQL hostname */
define('DB_HOST', 'localhost');
4、修改完成后,按 **Esc**,输入 **:wq**,保存文件返回。
**五、验证 WordPress 安装**
1、在浏览器地址栏输入`http://域名或云服务器实例的公网 IP/wordpress 文件夹`,例如:
http://192.xxx.xxx.xx/wordpress
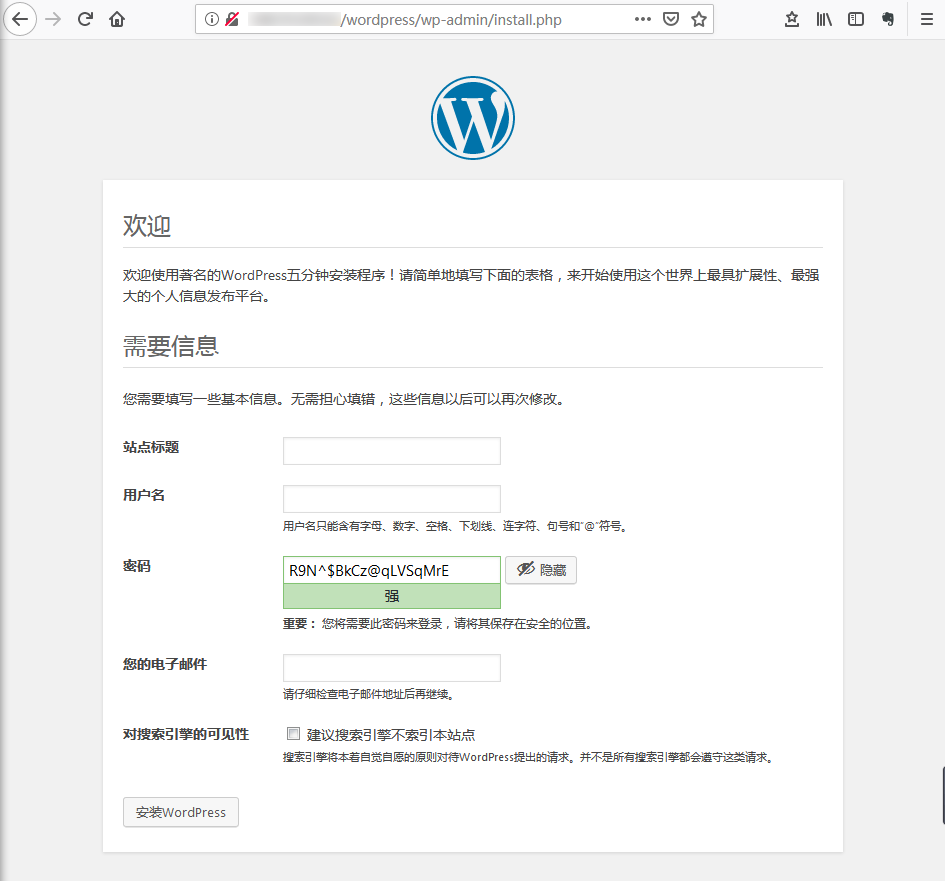
2、转至 WordPress 安装页,开始配置 WordPress。

3、根据 WordPress 安装向导提示输入安装信息,单击【安装 WordPress】,完成安装。"
松果号 作者:松果号原创文章,如若转载,请注明出处:https://www.6480i.com/archives/106126.html
