".extra-menu { background-color: #f3f3f3; padding: 20px; } .extra-menu .extra-menu-h { height: 36px; } .extra-menu .extra-menu-h h3 { display:inline-block; } .extra-menu ul a{ text-decoration: none; } .extra-menu .menu-child { text-indent: 4em; } .extra-menu .menu-child:before { left: 4em; } .extra-menu .extra-menu-h h3 { line-height: 36px; } .collapse-toggle { float: right; cursor: pointer; user-select: none; display: inline-flex; align-items: center; font-size: 14px; } .collapse-toggle img { width: 30%; transform: rotate(180deg); } .collapse-content { margin-bottom: 0px !important; margin-top: 20px !important; overflow: hidden; max-height: 0; transition: max-height 0.3s ease-out; } .collapse-content.expanded { max-height: 1000px; /\* 设置一个足够大的值,确保内容可以完全展开 \*/ } .ph-id { position: relative; top: -90px; } jQuery(document).ready(function( $ ) { $('.collapse-toggle').on('click',function(){ var content = document.querySelector('.collapse-content'); content.classList.toggle('expanded'); if (content.classList.contains('expanded')) { $(this).find('div').text('收起'); $(this).find('img').css('transform','rotate(180deg)'); } else { $(this).find('div').text('展开'); $(this).find('img').css('transform','rotate(0deg)'); } }) })
[GitLab](/#) Runner是一个开源软件系统,运行CI/CD作业,并将结果发送到GitLab。GitLab中的每个项目都可以有自己的运行器,每个运行器都是一个容器,可以根据需要启动和停止。本文主要介绍下如何在Vultr Kubernetes引擎上安装配置GitLab Runner。
**一、设置GitLab Runner**
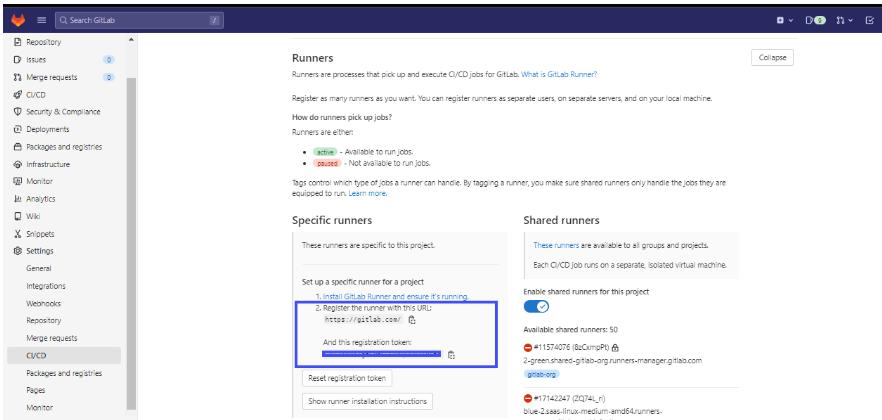
在GitLab项目目录中,点击Settings > CI/CD > Runners,获取runner信息,用来向GitLab认证runner。复制runner URL和注册密码,并保存它们以便后续供GitLab Runner配置使用。

**二、在[Vultr](/#) Kubernetes Engine上安装GitLab Runner**
我们要在Vultr [Kubernetes](/#) Engine集群上部署Runner的话,则需使用kubeconfig文件来配置对集群的访问。kubeconfig文件用于提供对Kubernetes API服务器的访问,它由使用kubectl和其他Kubernetes组件来找到合适的API服务器并进行身份验证。
1、获取kubeconfig文件
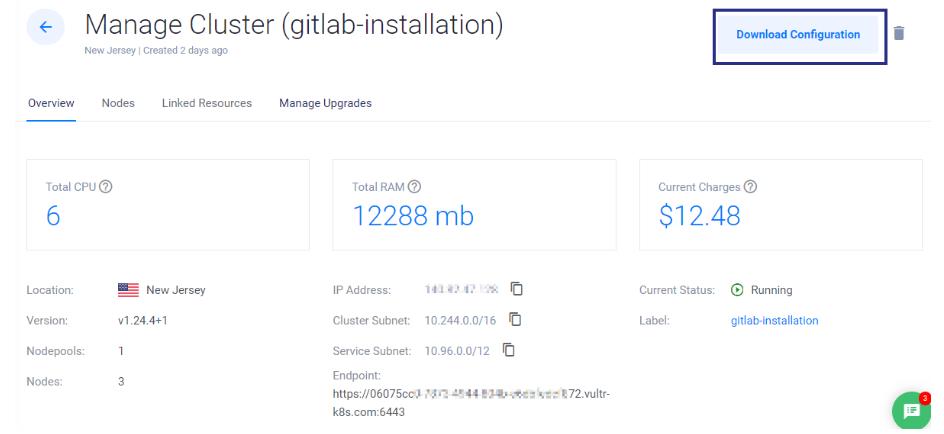
登录到Vultr账户,进入管理后台,导航至Products > Kubernetes > {Your cluster} > Overview,单击仪表盘右上方的Download Configuration按钮,如下图所示:

2、运行下面命令访问Vultr Kubernetes Engine集群
> $ kubectl –kubeconfig={PATH TO THE VKE CLUSTER CONFIG FILE} get nodes
3、使用kubectl创建一个名为gitlab-runner的名称空间
> $ kubectl –kubeconfig={PATH TO THE VKE CLUSTER CONFIG FILE} create namespace gitlab
名称空间用于隔离单个Kubernetes集群中的资源。例如,我们可以使用名称空间将多个应用程序部署到同一个集群,而不会相互干扰。这有助于维护和未来升级。
4、运行以下命令获取GitLab Runner副本
> git clone https://gitlab.com/gitlab-org/charts/gitlab-runner.git
如果您使用的是SSH密钥,则也可运行下面命令:
> git clone git@gitlab.com:gitlab-org/charts/gitlab-runner.git
5、导航到GitLab Runner副本的存储库,查看values.yaml文件。
\## GitLab Runner Image
image: registry.gitlab.com/gitlab-org/gitlab-runner:alpine-v15.3.0
\## Specify a imagePullPolicy for the main runner deployment
imagePullPolicy: IfNotPresent
\## Timeout, in seconds, for liveness and readiness probes of a runner pod.
probeTimeoutSeconds: 300
\## The GitLab Server URL (with protocol) that want to register the runner against
##
gitlabUrl: http://gitlab.com/
\## The Registration Token for adding new Runners to the GitLab Server.
##
runnerRegistrationToken: “Token”
\## For RBAC support:
rbac:
create: true
##
rules:
– resources: \[“configmaps”, “pods”, “pods/attach”, “secrets”, “services”\]
verbs: \[“get”, “list”, “watch”, “create”, “patch”, “update”, “delete”\]
– apiGroups: \[“”\]
resources: \[“pods/exec”\]
verbs: \[“create”, “patch”, “delete”\]
\## Configuration for the Pods that the runner launches for each new job
##
runners:
config: |
\[\[runners\]\]
\[runners.kubernetes\]
namespace = “{{.Release.Namespace}}”
image = “ubuntu:16.04”
为了避免操作失败,还需配置templates\\deployment.yaml文件:
livenessProbe:
…
initialDelaySeconds: 300
…
readinessProbe:
…
initialDelaySeconds: 300
…
6、配置好GitLab Runner副本后,使用以下命令部署runner。
> elm –kubeconfig={PATH\_TO\_VKE\_CLUSTER\_CONFIG FILE} install –namespace
7、然后运行以下命令,检查pod或部署的状态。
> kubectl –kubeconfig={PATH\_TO\_VKE\_CLUSTER\_CONFIG FILE} describe pods gitlab-runner –namespace=
8、要检查pod是否已经启动,请在注册的GitLab runners下进入GitLab,将会得到类似以下的结果。
"
松果号 作者:松果号原创文章,如若转载,请注明出处:https://www.6480i.com/archives/103264.html
